LAYING INSTRUCTION FOR JUNCKERS CLIP SYSTEM
Solid Hardwood Flooring | Commercial / Residential
C 1.1.2
C 1.1.2
Fig. 1
Junckers Clip System
C 1.0 General information
C 1.1 Clip System Information
C 1.1.1 Specifier's Information
C 1.1.2 Laying Instructions
BEFORE AND DURING LAYING THE FLOOR
The building must be weather tight. The heating system must be installed and tested and during the heating season should be in operation.
Cast concrete elements, screeding and other wet trades, which contribute moisture to the building, e.g. tiling, plastering and priming of paintwork, must also be completed.
The relative humidity in the building must be between 35 - 65% RH (UK) and the temperature approx. 20° C.
The residual moisture contained in the concrete or screed must not exceed 90% RH (UK: Concrete moisture max. 75% RH acc. to BS 8201, when checked by measure-ment). In wooden based subfloors the moisture content should not exceed 12%.
Solid boards should always be laid immediately on their arrival at the building. The packing on the bundles must not be removed until just prior to laying the floor, i.e. no acclimatising of the boards on site must take place.
NB: Read these laying instructions carefully before laying begins.
In case of doubt please contact your Junckers distributor before installing the floor.
Fig. 2
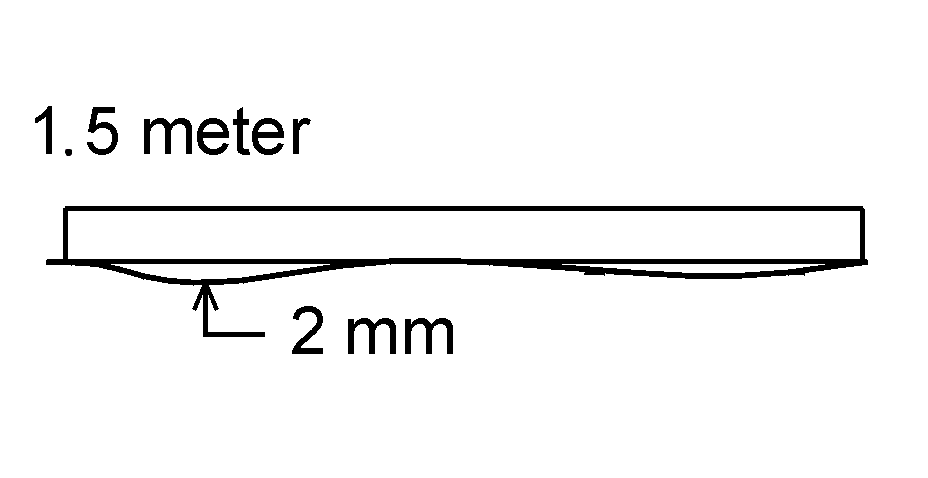
1. SUB-FLOOR CONDITION
The sub-floor must be levelled to a tolerance of no more than 2 mm gap showing under a 1.5 m straight edge (UK: No more than a 3 mm gap showing under a 2 m straight edge).
The surface must be smooth with no roughness. Local irregularities, e.g. above day joints, must be levelled.
Fig. 3

2. CLIPS
The clip size is determined on the basis of the expected maximum relative humidity in the building during the year.
For shipsdecking always use 3-hole clips (129.8 mm).
For Junckers 20,5mm x 140mm planks and Boulevard planks, 20.5 x 185 mm, always use 2-hole clips (129.4 mm) or larger.
In case of doubt, please contact your Junckers Dealer.
Number of clips required for 14 and 22 mm Parquet, Residential:
13 clips/m2 (clip spacing 700 mm) Commercial: 17 clips/m2 (clip spacing 500 mm)
Number of clips required for 15 and 20.5 mm Plank, Residential and commercial:
15 x 129 mm: 17 clips/m2 (clip spacing 500 mm). 20.5 x 140 mm: 16 clips/m2 (clip spacing 500 mm). 20.5 x 185 mm: 13 clips/m2 (clip spacing 500 mm).
Number of clips required for Shipsdecking, Residential and commercial:
129 mm board width: 17 clips/m2 (clip spacing 500 mm). 20.5 x 140 mm: 16 clips/m2 (clip spacing 500 mm). 20.5 x 185 mm: 13 clips/m2 (clip spacing 500 mm).
Fig. 4
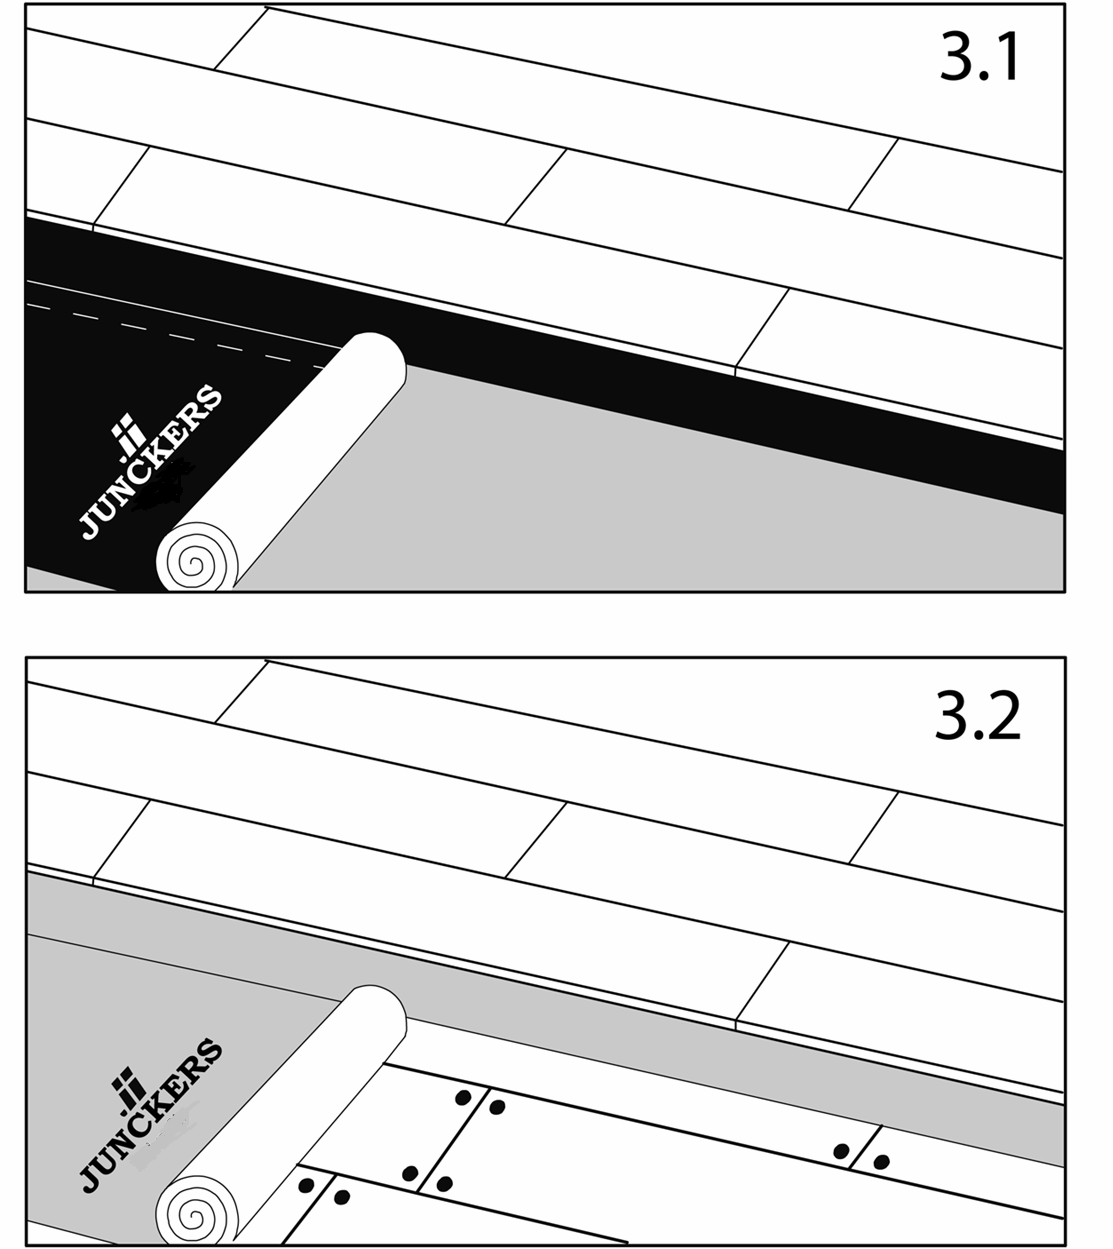
3. INTERMEDIATE LAYER
On concrete and screeded floors use PolyFoam as an intermediate layer, with lapped joints (remember to use the built-in tape) and turned well up at walls, etc.
On wood based sub-floors JunckersFoam is used as an intermediate layer with close fitting joints.
On intermediate layer of flooring grade Polystyrene laid on concrete, a 0.20 mm PE membrane with 200 mm overlay at all joints is placed on the Polystyrene.
Please contact your Junckers Dealer for advice.
Fig. 5
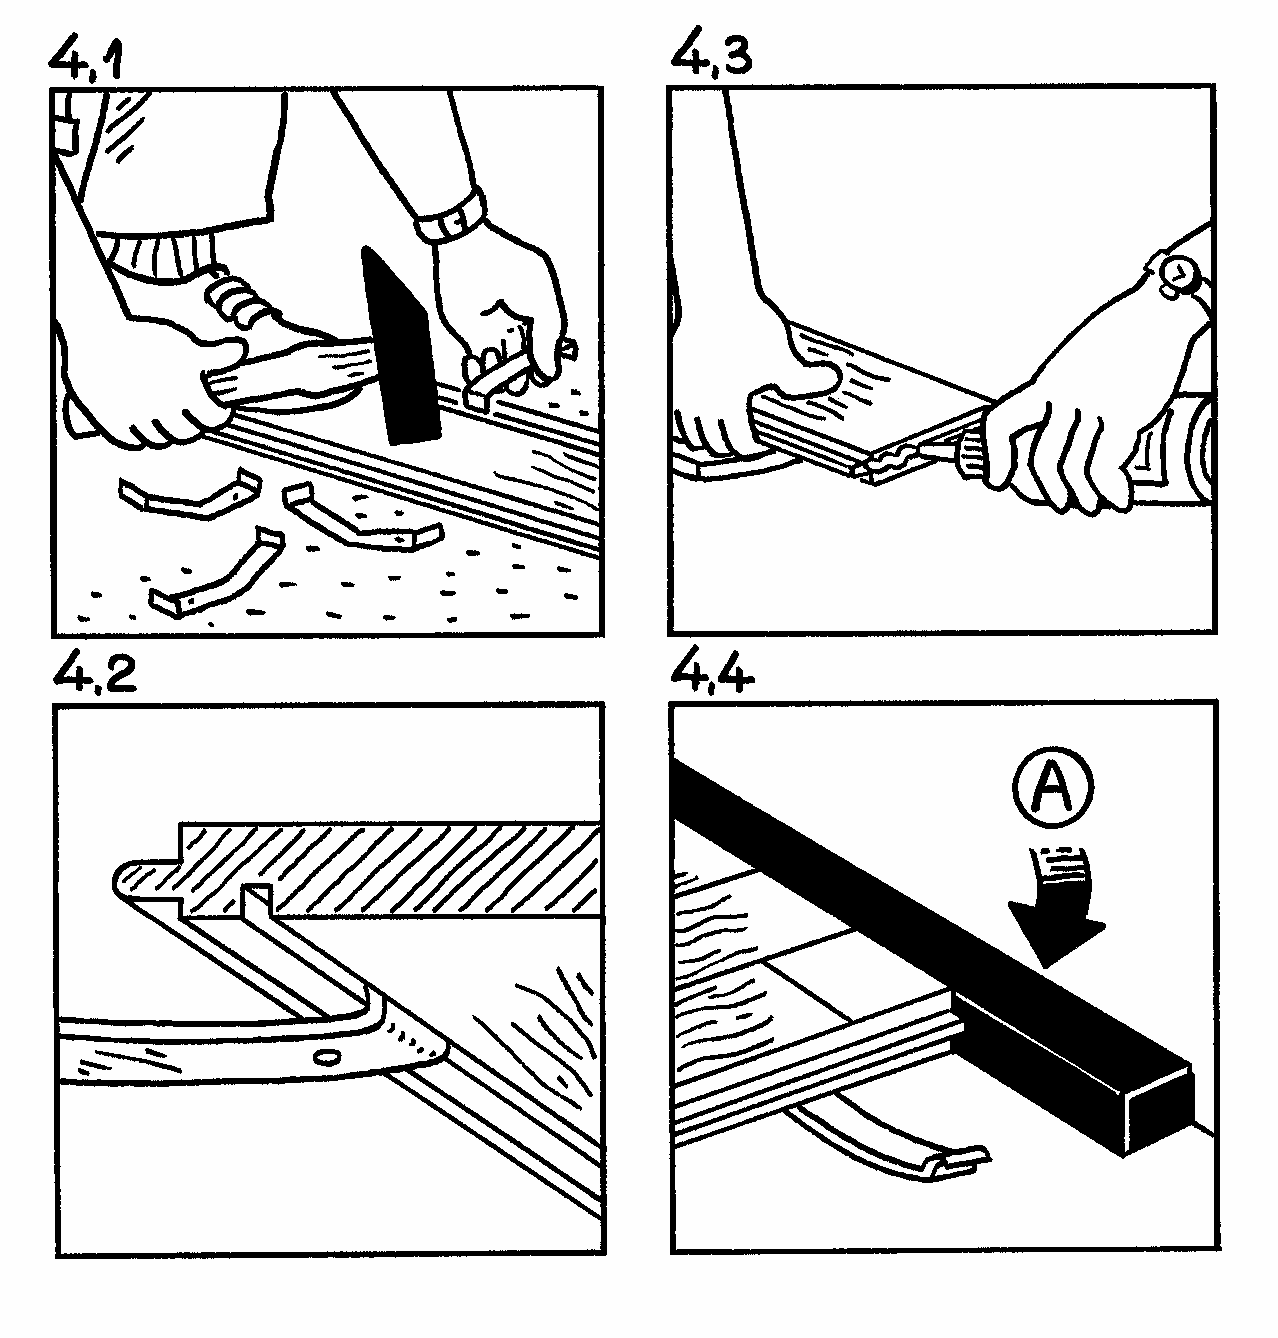
4. LAYING OF BOARDS - 1
It is recommended that the boards be laid parallel with the longest side of the room. Turn the board over and tap the end of the clip with the hole(s) into the groove on the back of the board, so that the plain end of clip points in the direction of the tongue, which is the laying direction (Fig. 4.1 and 4.2). Note: For 140 and 185 mm planks with double clip groove: tap the end of the clip with the hole(s) into the groove on the back of the board closest to the tongue.
Lay the board in place, tongue pointing away from the wall. Continue to the end of the row, gluing the header joints (Fig. 4.3). Cut the last board to length, use the offcut to start the next row.
Note: Solid boards must never be glued lengthwise. The gap between the end of the boards and the wall is filled with Junckers expansion strip. Ensure a close fit (Fig. 4.4). For floors more than 25 m in length it may be necessary to build joints into the floor.
Fig. 6
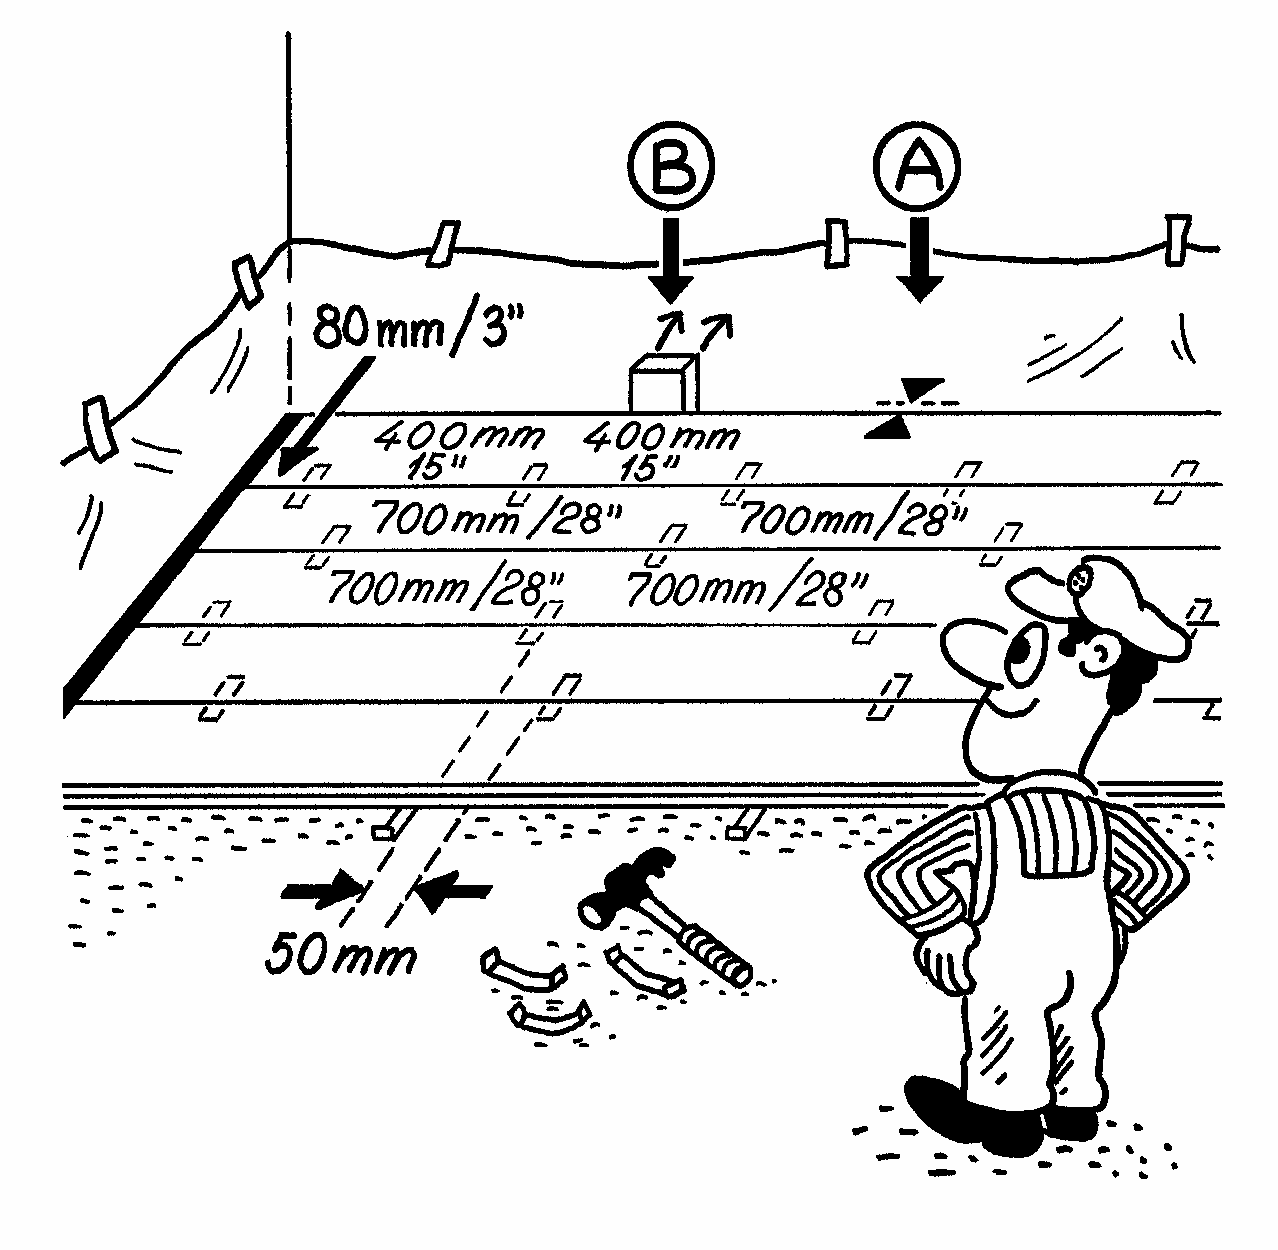
5. LAYING OF BOARDS - 2
The first and last row of boards is installed leaving a clear expansion gap at the wall using following directions: 2 mm for every metre of floor width at each side (A), always min. 12 mm (UK: min. 15 mm).
First and last clip: Maximum 80 mm from the end of the board. Other clip spacing: First and last row 400 mm centres. All other rows: see section 2 above. Clips must be staggered (in line) by approx. 50 mm. Use temporary spacers or wedges between the wall and the first row of boards to form the expansion gap (B).
To lay subsequent rows of boards, tap the joints together, using a wooden block working evenly along the board.
Fig. 7

6. LAYING OF BOARDS - 3
Lay the boards to a random pattern. Distribute the header joints as far apart as possible. However, the distance (A) between board joints in two successive rows should be at least 250 mm (Fig. 6.1).
Stave joints in one row of boards should not be in line with stave joints in a neighbouring row, but must be spread as far as possible.
Cut the last row of boards to form the correct size of expansion gap at the wall (Fig. 6.2). Glue the last board to the adjacent board along the entire length of the board. This is the only exception from the rule never to glue lengthwise along boards (Fig. 6.2).
Use a joint puller to slot the last board into place (Fig. 6.3).
Note: Remove temporary spacers or wedges at walls before installing skirtings (Fig. 5B).
Fig. 8
7. VARIOUS
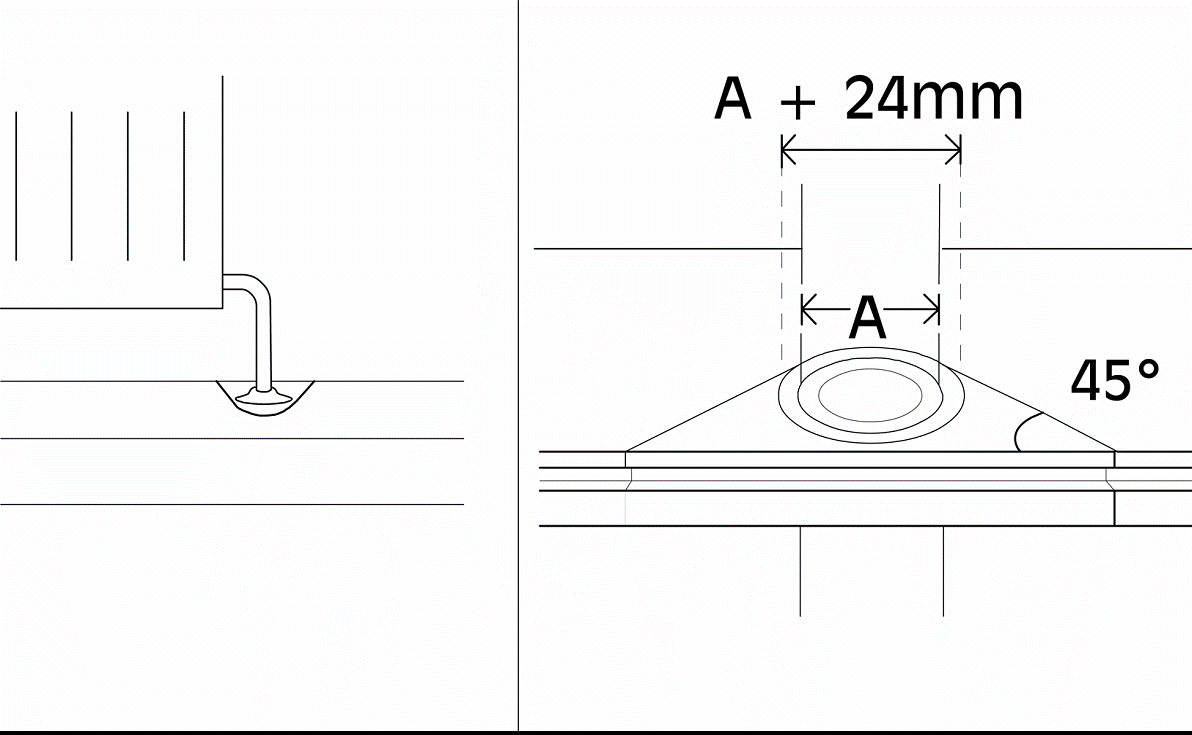
Around pipes, drill a hole in the board to accommodate the pipe. The space around the pipe must be the same as the expansion gap at the wall.
A tapered wedge is cut out, so that it can be glued in place. This gap is covered using a radiator pipe cover.
At door frames and architrave’s, cut the base of the frame and architrave to allow the floor to fit underneath.
At the threshold the expansion gap can be covered by a threshold strip or, if levels reduce, fit a ramp.
Fig. 9
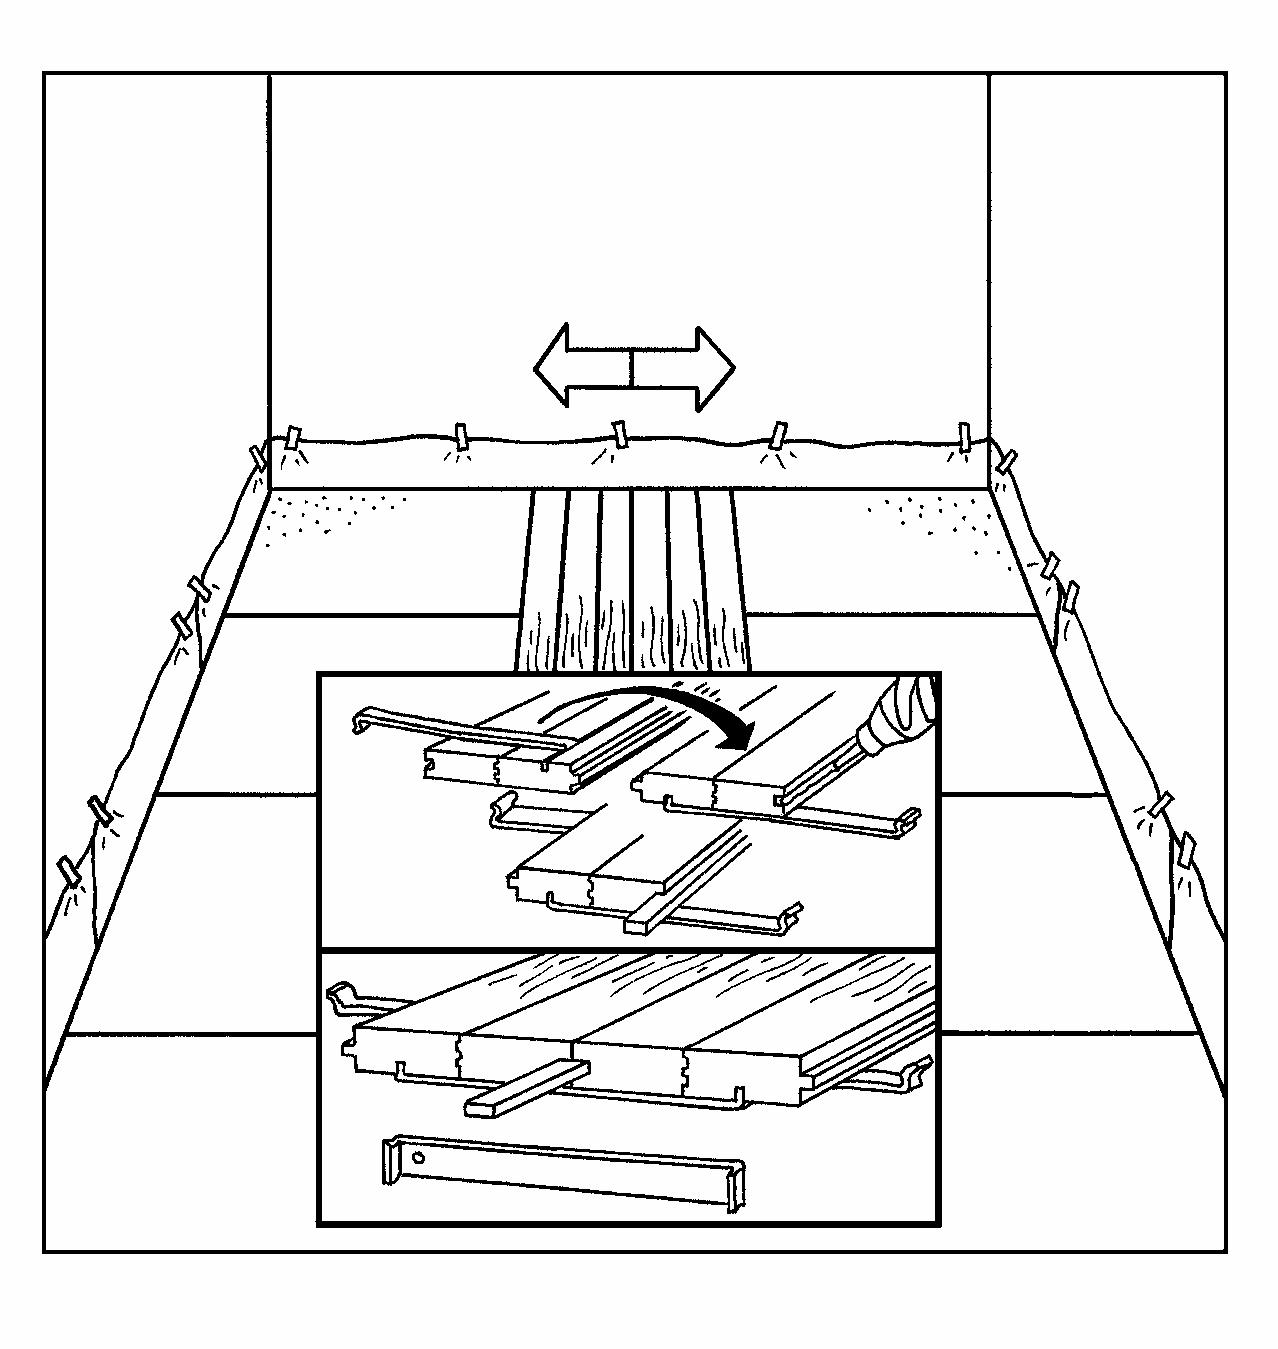
8. CHANGING LAYING DIRECTION
When laying large floor areas or when needing to change the laying direction it is recommended to use Junckers 2-way clips.
The two rows of boards are laid with the two way clips and a loose tongue which is glued to one board along the full length. Afterwards the laying is continued with normal clips according to the instructions.
A floor surface of min. 15 boards in the width in one laying direction must be laid before the laying in the opposite laying direction is begun. This is done in order to avoid unevenness in the line of the boards.
The clip distance for 2-way clips is 300 mm and for normal clips 500 mm. To prevent the clips from touching each other, alternate them in line at intervals of about 50 mm.
Note: Remember to place the normal clips (section 2) together with the 2-way clips, at the two rows of boards.