LAYING INSTRUCTION
PRO COMPLETE 44
Solid Hardwood Flooring
D 12.1.1
D 12.1.1
Junckers Pro Complete 44
D 1.0 General information
D 12.1 Specifier's Information
D 12.1.1 Laying Instructions
BEFORE INSTALLATION
The building must be weather tight. The heating system must be installed and tested, and during the heating season there should be a constant heat supply.
Cast concrete elements, including casting of sockets for fixtures and fittings, screeding and other wet trades which can contribute with moisture to the building, e.g. priming of paintwork, must also be completed.
The relative humidity in the building must be between 35 - 65% RH (UK) and the temperature approx. 16-20°C.
The residual moisture contained in the concrete or screed must not exceed 90% RH. (UK: 75% acc. To BS 8201).
The panels must be stored under the same climatic conditions as when the floor is used.
NB: Read these instructions carefully before beginning the installation. In case of doubt please contact your Junckers distributor.
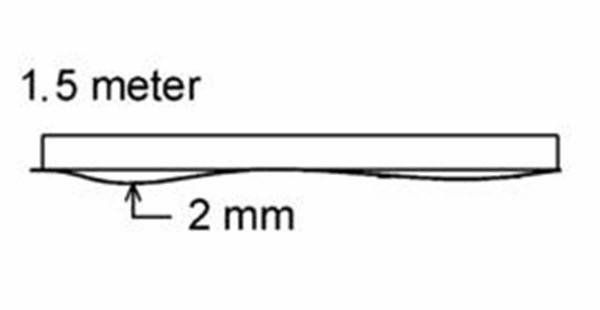
1. SUB-FLOOR CONDITION
The sub-floor must be levelled to a tolerance of no more than 2 mm gap showing under a 1.5 m straight edge (UK: No more than a 3 mm gap showing under a 2 m straight edge).
The surface must be smooth with no roughness. Local irregularities, e.g. above day joints, must be levelled.
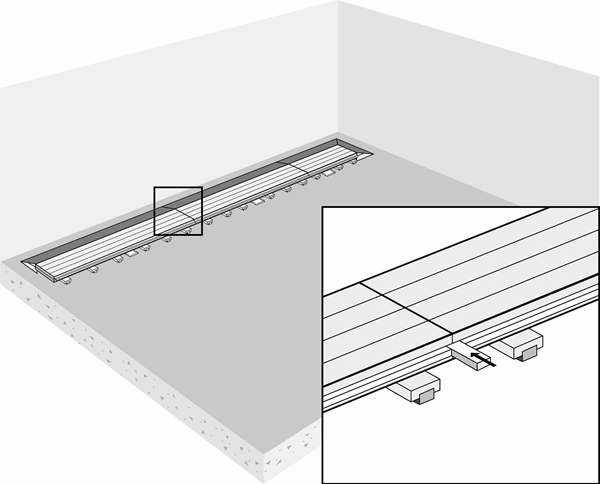
2. INSTALLATION - FIRST ROW
The first row of panels are laid in a straight line with the metal bracket pointing in the laying direction.
The panels are joined at ends by using loose joining tongues (See the small drawing).
All the panels should be numbered on the back side or on the metal bracket, to ensure that they are correctly placed each time the floor is laid, so that line markings, etc. are aligned.
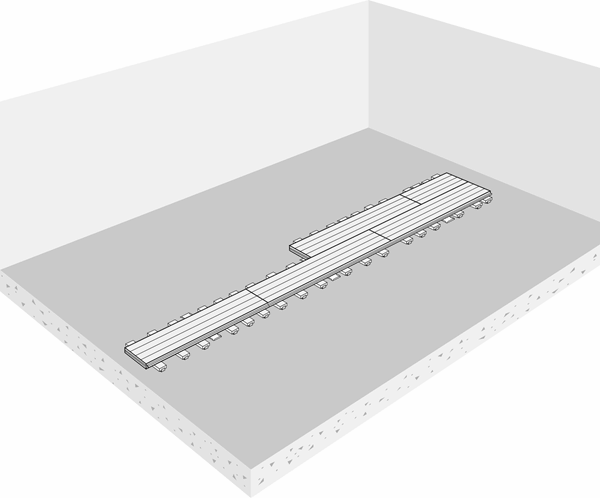
3. INSTALLATION, PANEL PATTERN
The panels are laid in an interlocking pattern so that all end joints are staggered 900 mm from row to row.
NB: The panels are pressed close together in lengthwise tongue and groove joints before they are pressed down into the metal bracket.
Panels without the metal bracket are used for the last row.

4. TRANSITIONS RAMPS
The first and last row of panels, as well as the first and last panel in each row, are delivered with prefixed black painted transition ramps, and should be installed accordingly.

5. FLEXIBLE INSTALLATION - CENTER ROW FLOOR PANELS
Centre Row panels are available on request with this floor type.
These panels come with metal brackets on each side and are laid out in the middle/centre of the floor as a starting row.
In this way two installation teams can work at the same time.
6. DISMANTLING
Remove loose joining tongues using the removal hook, and dismantle the panels row by row starting with the last installed panel.
Carefully take up the panels and stack them in the storage carts. Panels are stacked face to face and back to back, and staggered 5 cm so that the battens support each other leaving no pressure on the foam.
Storage cart:
Junckers storage cart stores 40 panels.
